skip to main |
skip to sidebar
Again I would like to congratulate you all on a great start with your section perspectives. Now that you know how easy it is to develop layered graphics, it is time to continue to develop their graphic quality and the craft of composition. If needed, and it is likely necessary for a majority of you, reorient your section perspective views being sure that they are at the eye-level of a floor that you want to emphasize. Be sure your section is a longitudinal section perspective. Avoid oblique views from helicopters. The same goes with your immersive interior perspectives.
There are four aspects to this week's assignment - the first two are preparatory, and the second two - the section perspective and developed interior view - will be central to your mid-term review presentation.
Submissions are due by end of Sunday, April 29th, with the exception of the Entourage Databse below.
Entourage Database DUE SATURDAY by NOON
Using the selection tools in Photoshop, create entourage elements with transparent backgrounds to be placed in your Illustrator perspectives (which includes your section perspective). This will be a class effort so that everyone has access to everyone else's entourage forming a large database - an entourage zoo - with little effort. No profane or Rated R elements are allowed. You are to create three unique entourage elements:
1) A person or grouping of people
2) A landscape element
3) Anything you choose
Criteria
Files should be min of 180 dpi.
Files should be cleanly created so edges are crisp.
Submission
Post your graphic on your blog as a PNG file, indicating its filename (LargeOakTree.png).
Drop this file on the Course Network folder in the folder named Entourage Zoo. Be sure to place your entourage
item in the appropriate folder. Categories are People, Landscape, Animals, Furniture and Vehicles.
Sketch-Up Clean Up and Development
You may still develop your SketchUp models. Changes made should focus attention on the two immersive interior perspectives and the section perspective. The quality of your SketchUP model will be apparent in your submitted perspectives. At your option, you can begin to use color SELECTIVELY to emphasize certain elements. Do not use materials and avoid candyland (color overdose).
Criteria
Align and refine your model so that cubes touch each other and do not overlap.
Trim and cut back faces that occupy the same plane - for example, you can trim your transparent box deleting faces that overlap opaque areas.
TIP: To "trim" objects that intersect, preselect the objects you are working on, and go to "Edit - Intersect" and select "Intersect Selected Only". You can then delete faces that are overlapping. I DO NOT recommend you use the feature to intersect entire model.
Submission
Place your SketchUp model in the appropriate folder within our course folder. Name it .
Section Perspective with Entourage
Criteria
Appropriate View is selected (see above)
Extraneous lines are deleted and lineweights are appropriate (bolder at section cut)
There are no "jaggies"
TIP: Turn off all "Edge Styles" (View - Edge Style). Then Export. Be sure to export outlines as vector file and overlay onto raster export.
Entourage is scaled appropriately and significantly impacts view.
Post a completed PNG file on your blog.
Interior Immersive Perspective with Entourage
Note that his week only one interior perspective is due, but two are due for mid-term. You are free to begin your second interior perspective now. You can submit a second interior perspective as well to get feedback. The same techniques apply in layer raster and vector files types as in the section perspective. As noted above, color can be used SELECTIVELY to emphasize certain elements and give a sense of depth. Be sure the view does not appear too dark.
Criteria
View is carefully selected with foreground, middle ground, and back ground.,
Camera View Angle is appropriate
TIP: I HIGHLY suggest you use two-point perspective. Don't forget to change view angle (e.g. 24mm).
Appropriate use of Raster / Vector layers is demonstrated, and lineweights are used effectively.
Entourage is scaled appropriately and significantly impacts view.
Views through windows are directed toward a background and/ or other entourage giving a sense of place.
Post a completed PNG file on your blog.
I may have misunderstood the question in class today regarding the free upgrade from CS 2.3. If you already purchased CS 2.3, then you should be fine. CS3 has been released, so upgrade now. If you haven't purchased CS 2.3, and were hoping to purchase CS 2.3 now with the free upgrade, this is probably no longer an opportunity.
Again - If you already purchased CS 2.3, you should still be eligible for the free upgrade and I would do that immediately.
A few questions have come in on Assignment Three -
"Cubes" refers to the cubes in assignment two - both 11' and 22' cubes.
Regarding cube components - this is a feature of SketchUP that is usefull to use, and can be very useful if you rotate your components in plan as I demonstrated in class. However, you can alwas explode an instance of a component to make it unique. Please, BE SURE THAT YOUR CUBES ARE VARIED - through rotatating components in plan and exploding them. This is the only way to get a continuity of space.
Assignment Two rules still apply, except for the new height restriction of 55'.
"saving moves" and splitting down the middle. Yes, this is confusing. This is simply to extend your kit of parts to include longer length pieces for walkways etc. Just have fun with it, nobody is going to count all of your parts - it will only be noticeably if you have way too many or not nearly enough elements in your design.
The important thing is to vary your section through maintaining a continuity of movement, and develop two immersive interior perspectives that have visual depth.
Feel free to ask other questions through the comments secton of this post.
Evidently there is a bug in the software which does not allow PC users to export a section slice in the perspective view.
There are a couple workarounds for this:
You can export a DWG through the 2d Graphic export (instead of Section Slice). You will then have to erase the other lines, or be creative and make these lines work for you.
You can export an EPS through the 2d Graphic export, and the comments above apply as well.
You can also open your file on a friend's Mac, and export the Section Slice as described in the assignement.
Developed from your three variations from assignment two, you are are to develop one of those schemes though the following criteria:
Design Goals
Based on the centralized, decentralized or hybrid scheme, the goal is to develop a continuity of space as you move throughout the composition. The continuity of space is demonstrated in both section and perspective. The section is the primary design vehicle to develop this continuity of space. Immersive interior perspectives will demonstrate the continuity of space through foreground, middle ground, and background elements. Turn the Sun on in SketchUp, and use the time and date sliders to observe how the sun impacts the spaces you are creating - use the sun as a design tool getting sun deep into your building.
Design Development- The height limit is now 55'.

- Each cube must be connected to other elements by at least two faces or at least three edges. No floating cubes!
- Each cube must sit flat with respect to the base. Cubes can be rotated to align with the edges of the base, but cannot be rotated in elevation.
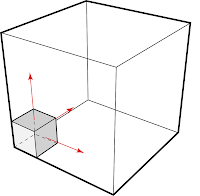
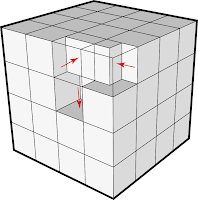
- All opaque elements must have walls that are 6" thick, and ceilings that are 12" deep, and be open on two facing sides. (See Diagram). Note: the ceiling of one cube is to be the floor of cubes or walkable spaces above.
- Each cube will be extended the width of the cube in only two planes (e.g. ceiling and wall or two walls). (See Diagram).
- You can save these moves for
 connecting walls and floors, and you can split these down the middle (So by saving one extension of an 11' cube, you get (2) 5.5' x 11' or (1) 11' x 11' wall or floor).
 - Connect spaces through floors / ceilings so that there are no isolated spaces.
Submittal Requirements
From SketchUp, post the following views:
- One Plan View
- One Elevation View
- One Immersive Interior Perspectives with a Focal Length of 24mm
- Save this view as a Scene
- One Immersive Interior Two- Point Perspectives with a Focal Length of 24mm
- Save this view as a Scene
- One Section Perspective
- Save this view as a Scene
As demonstrated in class, develop a layered section perspective in Illustrator.
- Submit your Illustrator file in the "Assignment Three" folder in your respective section folder on the network. Use the same Section Perspective as the one required above.
- Post a PNG file of this layered section to your blog. (See steps below for assistance).
Your Illustrator file will be a composite of three layers, from files exported from SketchUp.
From SketchUp
Export a "Section Slice" from your SketchUp section perspective view. Export as a DWG 2000, and in Options, be sure to select "Screen Projection."
For the raster section view, in SketchUp go to View-Edge Styles-and deselect profiles, be sure you are in a shaded view. Export a "2d Graphic", choose "TIFF" file format, under options, set resolution to 150 pixels / inch, and select "transparent background."
For the third layer, choose the wireframe view in SketchUp, and export this view as EPS file format, under options set Lineweight to .25.
In Illustrator:
Layer One - Section Cut
Open the section slice file in Illustrator, and use the "Live Fill" to infill between the section cut. Choose a contrasting color of your choosing (e.g. Red), and increase the stroke of the section cut (2-4pts). Name this layer "Section Cut."
Layer Two - Raster Perspective
In Illustrator, create a new layer, and name it "Raster Perspective." "Place" your TIFF file, making sure that you have preselected this new layer. Scale this raster layer so that it aligns EXACTLY with the previous layer. TIPS: you can lock the layer above so that you are only scaling one layer. Make sure that Section Cut is the top most layer.
Layer Three - Vector Hidden
Lines In Illustrator, create a new layer, and name it "Vector Hidden Lines." Place the EPS file on this layer. Scale this vector layer so that it aligns EXACTLY with the previous layers. The Vector layer should be above (on top of) the raster layer, but below the Section Cut. Make sure the lineweights are .25 pt. (They will most likely have changed when you scaled up the EPS file). In Illustrator, export this Layer Section Perspective as a PNG. In the options, 150 PDI is fine and use a white background. Post the PNG to your blog with the other required views.
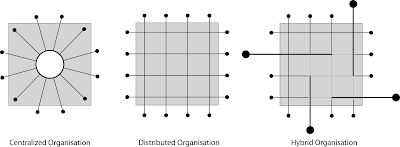
You are given a narrow site and a fixed set of volumetric entities. You are to create three unique design proposals. Each proposal must follow the same requirements listed below. The first scheme is to be composed with a centralized focus. The second scheme is to be a decentralized composition. The third scheme is to be a hybrid scheme between the previous two, creating areas of centralized focus as well as overall decentralization to maintain dynamic spatial interest. Figures are given for explanatory purposes, you must interpret how these design principles will develop given the constraints of the site and the given volumetric entities. Design focus should be placed not only on the arrangement of the given volumetric entities, but on the space that is formed between these entities. Note on Tips: refer to the Sketch-Up Help menu searching words in quotes (e.g. "groups").
Submission
Post the required views to your blog by the end of Sunday, April 15th.
Submit one folder, with three SketchUP files in it, to the network course folder. Your folder will be named "_asg2" (e.g. Cabrinha_Asg2), and each SketchUP file should be named "_centralized", "_distributed", "_hybrid" accordingly. Folders have been created for each section under the folder name "Assignment Two," place your folder within your appropriate section folder.
Email your GTF for instructions to log onto our course folder.
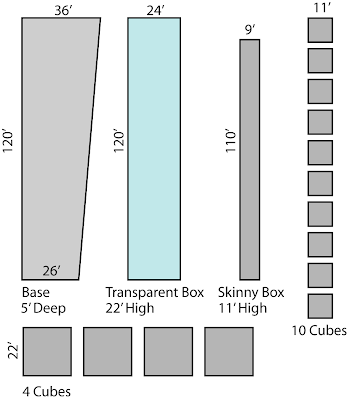
Kit of Parts
 Design Requirements
- Use each of the volumetric entities given, no more no less.
- The composition must not extend beyond the boundaries of the site.
- Opaque volumes should not intersect, but do not have to meet at their respective corners.
- Opaque volumes can intersect and be contained within the Transparent Volume.
- Each scheme should be clearly composed around its design principle (Centralized, Decentralized, and Hybrid).
Presentation / Technical Requirements
- One Overall Isometric View
- Two Orthographic Views
- One Plan View
- One Longitudinal View
TIP: Be sure to set view to "parallel projection" in Camera Menu.
- One eye-level view (4'-6" eye height) standing on the site
TIP: "Eye-Height" can be set with the "Position Camera Tool"
Don't forget to make sure Camera is set to Perspective
TIP: Try using the "Two-Point Perspective" method to make vertical lines appear straight.
Don't forget to change "focal length."
- Each required view must be saved as a "Scene" in your SketchUp File.
TIP: Don't forget to right-click on the Scene Tab and select "update" to save the view.
- Each of the four kinds of entities must be on their own layer in your SketchUp File (22' Cubes, Transparent Box, Skinny Box, and 11' Cubes).
- Make the Cubes "Components" (one component for 11' Cubes, another component for 22' Cubes)
- Make the Site, Transparent Box, and Skinny Box each as a separate "Group"
Regrettfully, Safari and Blogger don't mix well. You may have not noticed, because there is some funcionality. However, you will want to use Firefox as you can easily modify text, place links, and should deal with images easier. I use Safari for all of my web browsing and bookmarking, but use Firefox for Blogger. Fortunately, Firefox is free.
Although Sketch-UP (SUP) for Vista is not officially supported, the Sketch-UP user forum is an exceptional resource. Note there is a link to the user forum on the sidebar of this blog. Apparently, SUP on Vista is possible, though it looks like a headache. Follow this thread for suggestions.
Following are the section assignments. Before your section tomorrow, be sure to have Sketch-Up 6 Pro installed, have run through the intro tutorials, and have set up your blogger blog. Enjoy!
8 am Sections
1. Brode Studio (Pacific 222): GTF Kristen Goldsmith
2. Gonzalez Studio (Pacific 208): GTF Brian Starkey
3. Haight Studio (Pacific 213): GTF Dan Goldstein
10am Sections
4. Utsey Studio (Pacific 218): GTF Gauri Rajbaidya
5. Etzwiler Studio (Pacific 220): GTF Kristen Goldsmith
6. Givens Studio (Pacific 223): GTF Brian Starkey
7. Matheny Studio (Pacific 211): GTF Dan Goldstein
Requirements
You are to develop two 32' cubes each with the same design criteria. One cube will be developed using an additive approach, and the other cube will be developed using a subtractive approach. Each cube will be developed in a separate Sketch-Up file. Note on Tips: refer to the Sketch-Up Help menu searching words in quotes (e.g. "groups").
DUE: Sunday, April 8th, posted by midnight.
Design Criteria- Provide for one clearly identifiable horizontally oriented space (void) through the cube..
- Provide for one clearly identifiable vertically oriented space (void) through the cube.
- Provide a minimum of 6 horizontal and 6 vertical objects.
- All objects are to be solid (completely enclosed).
- All objects should be on a 4' module.
- The composition should look significantly different in different views.
- The composition should contain space (void) that is as significant as the objects.
- The plane on which elements were built should not be obvious in the final composition.
Output
Export the required views as a jpg image, and post them to your blog. Provide a few sentences on each different approach. Provide a separate blog post for each model, named "Additive Approach" and "Subtractive Approach" correspondingly. Provide the following required views:
- One Overall Isometric View
- Two Unique Elevations
- TIP: Use control (PC) or command (Mac) and 1-6 to toggle between different elevations.
- Two Immersive Views
- Tip: Zoom into your model, change the "focal length" (try 24mm) using the zoom tool.
Process - Additive Approach 
Define the boundaries of the 32' cube by creating a 32' cube and subtracting the face only, leaving the lines.
Start with an 8' cube, altering it with the push-pull tool. Continue to develop design criteria adding additional objects.
TIP: use "groups" to maintain the identity of each separate object.
Process - Subtractive Approach
Create a 32' cube. Draw an 8' grid over each face. Using the push-pull tool, alter the cube to provide for the design criteria. TIP: You will have to draw the grid in 8' segments, you can make "multiple copies" to make this process quicker. TIP: If a face gets deleted, you can always bring it back by drawing over the lines with the pencil tool.
[For those of you that already have Photoshop, Illustrator and In-Design, upgrading to CS3 is up to you. If you have a licensed older version, and want to upgrade, then call Adobe regarding the upgrade cost to CS3 - it may or may not be different. If you don't own the Adobe Suite, then below certainly applies to you, and it is a very good deal. If you have a new Intel-based Mac, I highly recommend CS3 as it has been rewritten for the Intel Mac. Example: your professor requires a textbook, you find a different edition on-line used. The content is basically the same, but the page numbers and introduction are different, and a chapter or two have been re-written. The professor refers to certain page numbers for coursework and discussion, so you have to do a little extra leg work to connect your older edition numbers to the class discussion. If we all were on the same version, it would make life easier for all of us, but frankly, neither I nor the GTF's have CS3 either.
Having said this, I expect everyone will have the Adobe Suite installed on their computers by next week. ]
Just after our intro lecture today, I received some very good news about a special upgrade path for education purchases. If you purchase CS2.3 after March 27th, but before the CS3 shipping date, you can upgrade for free (you will have to pay a "media charge" for documentation and shipping historically around $20-25). NOTE: be sure to hold on to your receipts and any other documentation for the free upgrade - you will have to fax this in.
To purchase, you can try the Digital Duck as well as Adobe.com. The third rep I spoke with at Adobe suggested purchasing through on-line education retailers. I have used Academic Superstore in the past, and the Adobe rep suggested Journeyed or CampusTech.
This is actually an amazing deal. The Creative Suite 2.3 Premium costs about $399 and you will get the free upgrade to CS3 Design Premium which would otherwise be $599 (you will have to pay for "media charge" and shipping). This is what I have been told by Adobe's customer service, as hard as this is to believe. Buy now before CS2.3 is gone.


